In this article I will share how to add overlay to images in Divi using a free plugin.
The plugin we will be using is Overlay Image Divi Module. It is a free plugin which is available for download from the WordPress plugin directory.
The first step is to install the plugin on your website. If you are not sure how to install a plugin then you can read this article how to install a WordPress plugin.
Adding Overlay Module on a Page
Once you have successfully installed the plugin on your website the Overlay Image module should appear in your Divi Builder. If you had the page already open before you installed the plugin then you will have to refresh it.
If you are having trouble finding it in the list of modules then you can use the search bar to find it.

Adding Content to the Overlay Image Module
The content for the module can be set inside the Overlay Image Settings > Content > Text toggle.
There are 5 options in the Toggle in the Pro version of the plugin and only 2 options for the Free version of the plugin. If you are using the free plugin then you can skip the pro settings.
Lets update the Text settings with the following details.
- Content: Music
- Image : Leave default
- Button Text: Learn More
- Icon : icon_headphones
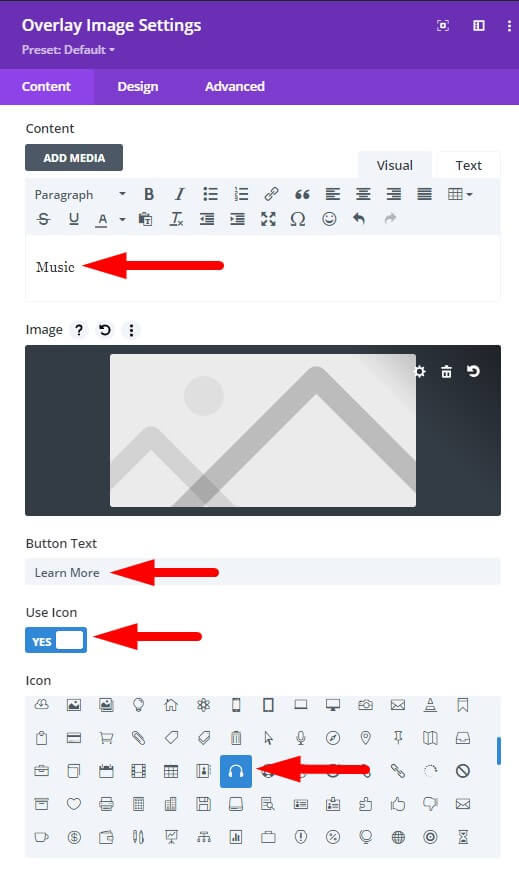
The button will not appear until there is a link set for it. It needs to be set under Overlay Image Settings > Link > Button Link URL.
- Button Link URL : #

Styling the Overlay Image
The next step is to style the Overlay Image. All the styling options for the overlay content such as Icon, Overlay and Body text can be found inside the Design tab in the module settings.
Styling the Icon
Go the Design > Icon toggle and set it with the below settings. The icon alignment should already be set to center by default.
- Icon Color: #ff6e6c
- Use Icon Font Size : Yes
- Icon Font Size: 80px
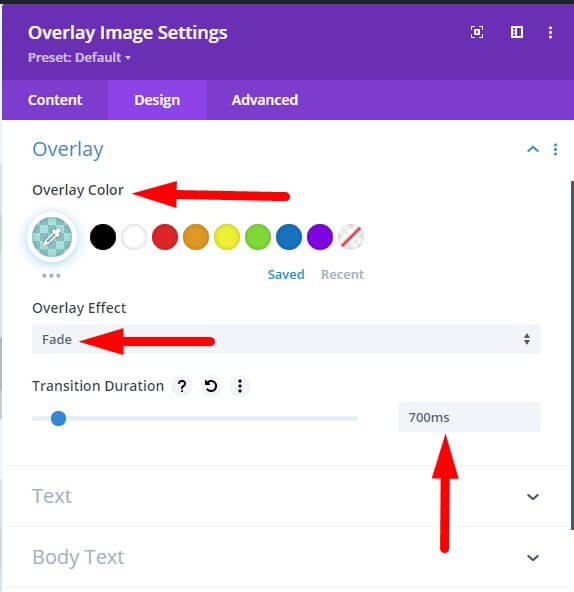
Overlay Style Settings
After the icon lets setup the overlay styles for the module. There are 3 animation settings for the overlay Fade, Slide and Zoom.
- Overlay Color: #ff6e6c
- Overlay Effect: Fade
- Transition Duration: 700ms
Overlay Body Text Styles
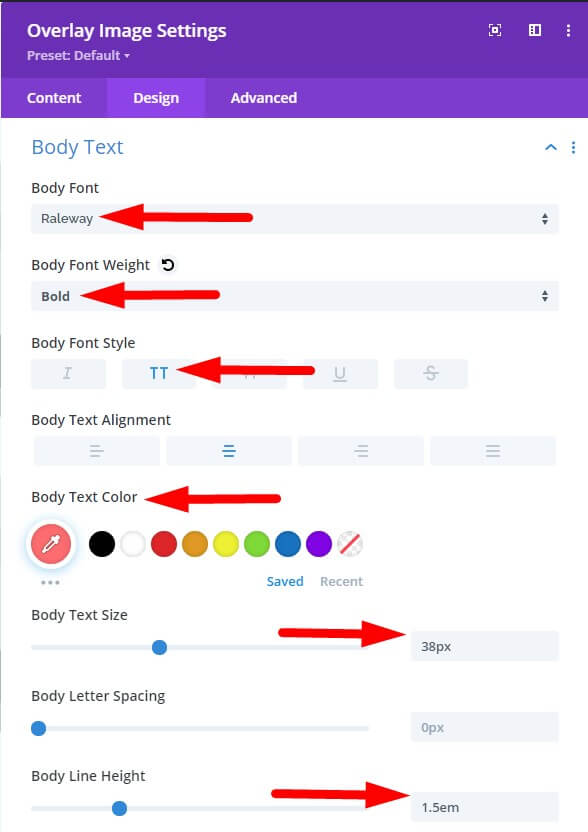
Now we can style the body text in the overlay. Open the Body Text toggle and apply the following styles to it.
- Body Font: Raleway
- Body Font Weight: Bold
- Body Font Style: TT
- Body Text Alignment: center
- Body Text Size: 38px
- Body Line Height: 1.5em
Overlay Button Styles
Next step is to apply styles to the button on the overlay. You will see all the custom settings after you set use custom style to Yes. You cannot see all the settings mentioned below in the screenshot however they are not difficult to find.
- Use Custom Styles For Button : Yes
- Button Text Size: 18px
- Button Text Color: #ff6e6c
- Button Background Color: #ffffff
- Button Border Width: 0px
- Button Font: Raleway
- Button Alignment: Center

Duplicate Overlay Images
We have styled one Overlay Image so far. Now we can duplicate it to create the other three. You can duplicate the Overlay Image by using the duplicate icon.
I am not going to share the steps one by one. You can duplicate the module three times and then refer to the images and instructions above if you have trouble finding an option.
We are just going to update the Overlay Animation settings for each duplicate module. The rest of the settings and values will remain same.
You can set the duplicate Overlay Image modules with the following animation settings.
- Overlay Image 2 Overlay Effect: Zoom
- Overlay Image 3 Overlay Effect: Slide
- Overlay Image 3 Slide Direction: Top
- Overlay Image 4 Overlay Effect: Slide
- Overlay Image 4 Slide Direction: Bottom
That’s it we are done. Leave a comment below if you found this helpful or have any questions. Don’t forget to subscribe to the Newsletter to receive the latest tutorials and updates in your inbox.
Hi,
I thought I could also make this work on videos, but I do not see that possibility (anymore).
Any tips on how I can easily add an overlay on a video?
hi,
I have this message
Warning: getimagesize(https://preprod.marketmail.dialogues.fr/wp-content/uploads/2024/05/icone-manpower-300×300.png): failed to open stream: HTTP request failed! HTTP/1.1 403 Forbidden in /home/dialoguec/PREPRODS/marketmail/wp-content/plugins/overlay-image-divi-module/includes/modules/OverlayImages/OverlayImages.php on line 266
Hello,
What I need to do to make “module Link” working?
Do I need pro version for the links only?
Does this module not work on fullwidth sections?
This is a standard module so it will not appear in a Fullwidth Section. However it does not mean that this cannot be made fullwidth.
1. Add the module in a regular row.
2. Open the Row Settings > Design > Sizing and set the Width and Max Width to 100%. This will make the Row fullwidth.
3. If you want to remove the white space from the top and bottom then you can set the margin top and bottom to 0px on both Section and Row.